Showing posts with label Vegetarian. Show all posts

1.23.2013

Moroccan Tomato Soup


Oh Ladies and Gentleman, it has been a long couple of weeks. I have been down and out with a bizarre shoulder injury. I classify it as bizarre because I still don't know what caused it or where it came from, all I know is it kept me away from the kitchen and left me bound to the couch, draped in a heating blanket (which actually felt really nice with these frigid temperatures) and popping Advil 'round the clock. Finally, with the pain 90% gone, I started to ease my way back into the kitchen to make some soup.


Whew. It felt so good to hold my knife and feel the cushion of our Chef's mat under my feet again. Two weeks might not seem like a long time but to me, it felt like decades. During my couch stay, Richard had taken over all cooking responsibilities like a champ, banging out incredible dish after dish. He even did all of the food for a tasting for a couple whose wedding we are catering this year and I've never been more proud. If I do say so myself, he nailed it while I turned the couch into a make-shift office/wedding central, alternating from work emails and phone calls to ordering cocktail napkins with our names and our wedding date on them. I missed cooking so much.


Since yesterday (and really all this week) is just perfect for soup, that's where I thought I'd start. Tomato soup is one of my favorites and from there, I gave it a Moroccan flair, just because I felt like something a little different. This soup was very simple to make, yet tasted complex and bright with flavors from different spices. It was the perfect introduction back into the kitchen.

Moroccan Tomato Soup 

- Enough Extra Virgin Olive Oil to coat the bottom of the pot
- 1/2 onion, peeled and diced
- 2 carrots, peeled and diced
- 1 clove garlic, peeled but left whole
- 1/2 tsp Ground Turmeric
- A pinch of Saffron (just a couple of threads)
- 1 tsp Ground Cumin
- 1 tsp Ground Coriander
-  1/4 tsp Ground Clove
- 1/2 tsp Ground Cinnamon
- 1 28 oz. can Fire Roasted Diced Tomatoes
- 1/4 cup Golden Raisins
- 1 TBS Preserved Lemon, chopped (you can use a little bit of lemon juice to taste if you can't find preserved lemon)
- Salt to taste

Coat a large soup pot lightly with olive oil and heat. Add onions carrots and garlic along with a generous pinch of salt. Heat vegetables for about 5 minutes until they soften. Add all spices (Turmeric, Saffron, Cumin, Coriander, Ground Clove, Cinnamon) and heat an additional 2-3 minutes. Add the Fire Roasted Diced Tomatoes and use to empty can to add two can-fulls of water to the pot. Add the raisins and bring everything the a boil and reduce the heat to simmer until the carrots are completely softened but not falling apart. Allow the soup to cool a bit, then place soup in blender and puree until smooth. Return soup to pot and heat soup until desired temperature. Add Preserved Lemon or lemon juice and salt to taste.

6.28.2012

Cheesy Chipotle Corn Chowder with a Twist


Cheesy Chipotle Corn Chowder with a Twist
One of my favorite things about creating recipes is looking for creative ways to twist up some classic dishes in a more seasonally appropriate way and this plays a big role in my cooking. During last week's heat wave, all I wanted to do was eat things that were simple and chilled. I ate watermelon for breakfast and cold salads and soups for lunch and the thought of anything warm or taking the time to prepare a formal meal was not anything I wanted any part of. This week, with the temperatures (thankfully) dipping down a bit, I was in need of something a little heartier and most importantly, my favorite, cheesier. 
Cheese!
At the grocery store and looking for some inspiration, the cascading front and center stand of corn at the grocery store had caught my eye and thus this dish got it's start; a creamy corn chowder base, bread and cheese on the top and a new favorite is born!


Soup's on!
The secret to my corn chowder is that I don't use any cream or milk and instead, I rely on a thick potato puree to create the creamy richness that makes a corn chowder so good. I laced my chowder with Cabot's Chipotle Cheddar Cheese as well as some chipotles to give it a smoky kick and then ladled the soup into individual crocks, topped with chunks of whole wheat croutons and topped it all off with more shredded Chipotle Cheese. If you find yourself craving something a little heartier during these rainy days, might I suggest this alternative. Or, if you find yourself not digging the whole crouton bread thing, that's cool, just leave that part out and you can still make the soup. Whether you decide to enjoy it hot, cold or room temp, it's just as satisfying; creamy, smoky and spicy from the cheese and chipotles, the soup also has a great sweetness to it from the corn and comes together quickly enough for this to be a nice weeknight meal.


Cheesy Chipotle Corn Chowder with a Twist 
- 4 ears of corn, husked
- 1 clove garlic, peeled
- 2 sprigs of fresh Thyme
- 4 Yukon Gold Potatoes, scrubbed clean
- 2 Chipotle peppers, minced (or use 1 for less heat)
- 1 cup shredded Cabot Chipotle Cheese, divided
- Salt to taste
- A couple of hearty pieces of whole wheat bread, cubed

Preheat oven to 350. Using a knife, remove the kernels of corn from the cob and place the kernels and cob into a stock pot with the clove of peeled garlic and thyme. Add enough water to just cover the vegetables. Season the water with salt and bring to a boil. Reduce heat and simmer corn for about 20 minutes. Turn off the heat and let is cool slightly. Remove cobs and thyme sprigs.

While the corn is cooking, peel the potatoes, cut them into even cubes and place in a medium-sized pot. Add just enough water to cover the potatoes completely. Season generously with salt and bring to a boil, reduce heat to simmer until the potatoes have cooked through. Strain potatoes, reserving the water used to cook the potatoes.

In a blender and working in small batches, puree the corn with the potatoes and add just enough potato water to reach desired consistency. Add chipotles and 1/2 cup of Cabot Chipotle Cheese. Season to taste with salt. Ladle soup into French Onion Soup Crocks. Top with cubes of whole wheat bread and then top with cheese. Bake until the cheese melts and the bread is crisped. Let cool for a couple of minutes before serving.

6.18.2012

Green Tea Soba Noodles with Peanut Sugar


Every time we'd go out to eat as a family growing up, if my Dad liked something that he ordered, he'd confidently declare that he would attempt to remake it at home. And he usually always followed through on this promise, at least making one (or hundreds) of attempts to get it just right. I think that somewhere along the line I inherited this gene and whenever I got out to eat, now I'm the one announcing that I will remake my own version at home. Sometimes it's one component of a dish or the whole thing and I'll work to do my own rendition of it to weave into my cooking. Case in point, the real star of these green tea noodles is the peanut sugar dusted on top and it is inspired by the pork belly buns at Jo Jo Taipei in Allston. I've had numerous versions of pork buns at lots of places but none have come close to these - a soft steamed bun folded around a hunk of braised pork belly that melts in the most delicate and flavorful of ways. While those components are memorable on their own, it gets even better, thanks to the peanut sugar that laces the whole bun, providing a nutty, crunchiness that elevates this dish to new heights. I just had to make it. I had to have it.


I didn't follow any recipes, although I'm sure there are some out there. I just went by my tastes, just like Dad, and ended up with something pretty close to the real thing. Easily enough, I simply ground up roasted peanuts, white sugar, cilantro and salt in the food processor. I think they slick theirs with some oil at the last minute but I left mine more powdery because I liked the look. And then, since I needed to add my new treat to a dish, I stir-fried some shiitake, portabello and oyster mushrooms with some chopped snow peas and edamame. Then I mixed in some green tea soba noodles, which I've recently become obsessed with because not only do they have a beautiful green hue to them, I love their earthy and slight grassy tea-twinged flavor. The whole thing got a couple healthy shakes of some good quality soy sauce and sesame oil and then diced up grapefruit was added to give it a welcome, tart finish. 


Similar to the Pork Buns at Jo Jo Taipei, the peanut sugar stole the show, adding a crunch to a dish that otherwise wouldn't have any and, not to mention, it just looked pretty, especially once combined with black sesame seeds. And while it was great in this dish, having some extra on hand has taken my salads to new levels too and I'm already dreaming up where else I can find a nice home for this special, crunchy, green powder. Maybe on some crostini? Topping a soup? Or maybe even hidden inside a sandwich or gracing the top of some meat? Endless options.  

Green Tea Soba Noodles with Peanut Sugar
Serves about 3-4, or two, if you're really hungry!

For the Peanut Sugar:
(Makes plenty for this dish, along with extras)
- 1 cup roasted, unsalted peanuts
- 1/2 cup cilantro leaves
- 2 TBS white sugar
- Salt to taste

Combine all ingredients into the food processor. Process until powdery. Set aside and store extras in an airtight container in the refrigerator. Will keep for about a week.

For the Noodles:
- 1 small package Green Tea Soba Noodles
- Assorted mushrooms, cleaned and sliced (I used an assortment of oyster, shiitake and portabello)
- Olive Oil for drizzling
- 1/2 cup frozen, shelled Edamame
- Soy Sauce, to taste
- About 1/2 tsp Sesame Oil
- 1/2 tsp grated, fresh ginger
- 1 grapefruit, segmented and diced, juice reserved
- Peanut Sugar, for dusting
- Black Sesame Seeds (optional)

Bring water to a boil in a medium-sized pot. Once water comes to a rolling boil, add noodles and cook according to package. While the noodles are cooking, heat just enough olive oil to lightly coat a large skillet. Add the mushrooms and cook until the mushrooms start to brown. Add the cooked noodles, soy sauce, ginger and sesame oil. Stirring to combine. Add the frozen edamame and heat for another minute or so, just until the edamame is cooked. Add the grapefruit juice and diced segments, adjust seasoning if necessary. Divide into bowls and dust with peanut sugar and black sesame seeds. 

12.06.2011

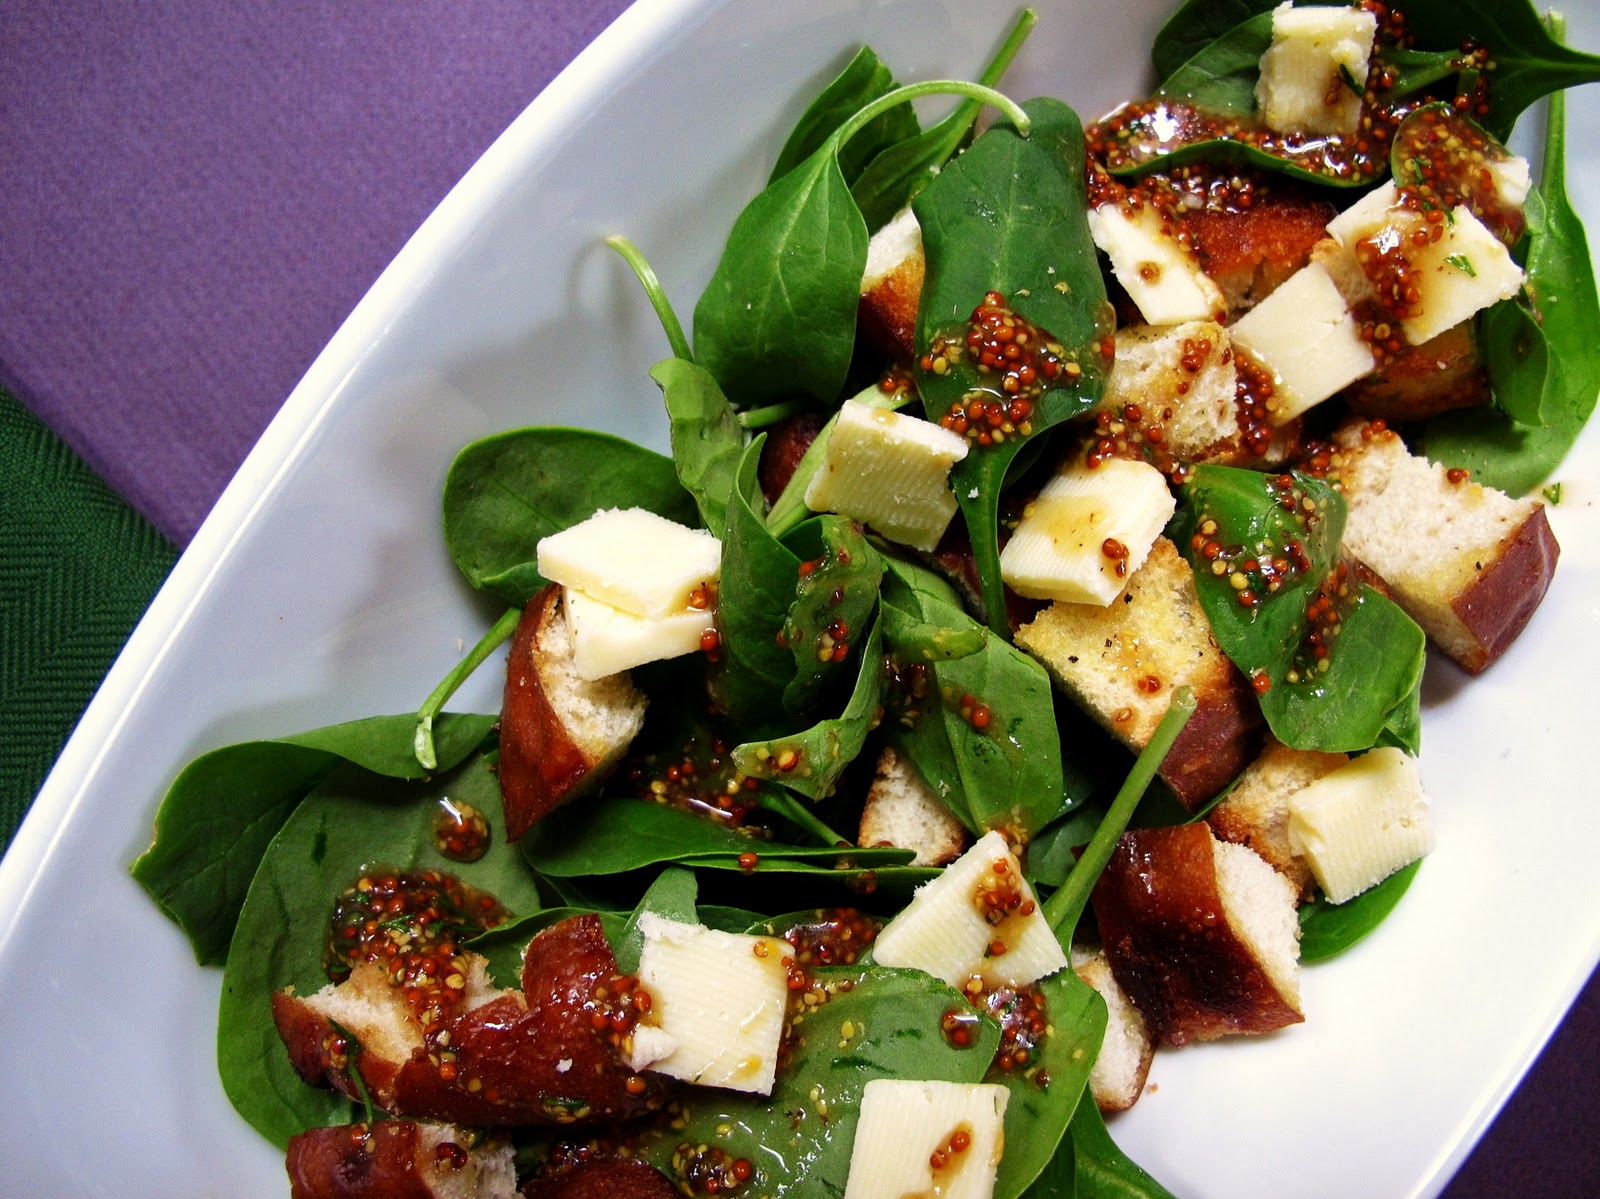
Pretzel Bread Panzanella Salad


Pretzel Bread is a curious thing: half roll, half pretzel. A nice toasty, pretzel-like exterior that gives way to a soft and bready center, it's my newest obsession. That may be due to the fact that my favorite snack is pretzels but regardless, it gives my sandwiches more oomph and makes them more special and admittedly, I've even snacked on them before. Needless to say, I'm happy to have this new bread option in my pantry however, I thought I could get a little more out of it and give it a different use, other than making my sandwiches more exciting.


Taking all of the flavors that just naturally compliment pretzels, mustard, cheese and herbs to start, I thought a Panzanella salad would be a great, new way to enjoy my new fave. Panzanella is Italian in origin and is traditionally comprised of stale bread, tomatoes, olive oil, salt and pepper, and sometimes onions and cucumbers sneak into the mix as well. Because of its heartiness, versatility and the fact that it can be thrown together in a pinch, Panzanella is something I often make. In this case, fresh baby spinach acted as the base of the salad, while little cubes of sharp cheddar cheese dotted the plate and a hearty mustard-herb vinaigrette supplied a welcoming tang at the end of each bite. The real star, of course, were the broken up bits of pretzel bread that were toasted with a drizzle of olive oil, salt and pepper. It provided a great pretzel-like crunch; more texture than regular bread but still had that pretzel like quality that I love so much.


This salad is easy to make, yet satisfying enough to be a full on meal. Of course the ingredients can be interchanged and it works with practically any vegetable or fruit that you have on hand. The pretzel bread can be a little tricky to track down, but should you come across it, don't pass up the opportunity to give it a shot. At some point over the next couple of months I'm going to be making my own pretzel bread at home and when that happens, I'll be sure to share.


Pretzel Bread Panzanella Salad
Serves 2


- 2 pretzel rolls, broken up into small bits
- 2 large handfuls of baby spinach
- Cheddar Cheese, cut into cubes
- 2 TBS whole grain mustard
- 1 tsp fresh dill, chopped
- 1 tsp fresh parsley, chopped
- 2 TBS Olive Oil, plus more for drizzling
- 1 TBS Sherry Vinegar
- Salt and Pepper to taste

Preheat the oven to 375. On a baking sheet, lay out the pretzel bread into a single layer. Drizzle with olive oil, sprinkle with salt and pepper and bake until the pretzel bread crisps up and turns golden brown. Set aside to cool. In a small bowl, whisk together mustard, dill, parsley, olive oil and vinegar. Season to taste with salt and pepper. Divide the salad into two bowls and sprinkle with cheese. Toss in the pretzel bread and drizzle with dressing. Serve immediately.

11.28.2011

A Duo of Roasted Dips: Beet and Parsnip

Roasted Parsnip Dip with Sweet Potato Chips
Like every year prior to this, my family and I each have our own roles in the Thanksgiving day festivities. My Dad leads the charge on the turkey and stuffing front while my sister handles things in the potato department, contributing her sweet potato casserole and whipping up the mashed potatoes in addition to making the desserts. My Mom is our interior decorator, setting a fancy table scene fit for a king, all while she makes a classic green bean casserole. I am left to snack detail, and since I don't take my responsibility lightly, I like to challenge myself to try new things and change it up each year to keep things interesting. A couple of this year's appetizers were inspired by some of Ana Sortun's recipes from her book Spice, Flavors of the Eastern Mediterranean as well as influenced by seasonal ingredients and flavors. I made two dips, the first, a roasted parsnip dip, served with sweet potato chips and the second one, a vibrant beet dip with toasted bread.

Roasted Beet Dip
Roasted parsnips are the unexpected star of the first dip, sweet and with a nuttiness and a natural nutmeg flavor to them, when pureed with fresh rosemary and oregano and a couple splashes of milk, the end result is quite tasty. Smooth and luxuriously creamy, it's a perfect accompaniment to crispy sweet potato chips. The second dip also features something that doesn't make frequent appearances on the dip front - beets. Once they are roasted, they are grated and mixed with Greek yogurt to create something that the eye can't help but be drawn to. Lemon juice and zest perk up the flavors and fresh parsley rounds everything out, creating a beautiful contrast of colors.

Roasted Parsnip Dip
Not only are these dips something a little different, they're super easy to make, with most of the flavors being attributed to the caramelization that happens when the vegetables are roasted and force all of the sugars to the surface, concentrating their flavors and making them naturally flavorful. Give 'em a try..

Roasted Parsnip Dip
- 4 to 5 parsnips, washed, peeled and cut into even sized pieces
- 1 sprig of fresh rosemary, leaves removed and minced
- 1 sprig of fresh oregano, leaves removed and minced
- Milk - just enough to make the dip come together (I used about 1/4 cup)
- The juice of half a lemon
- A pinch of freshly grated nutmeg
- Salt and Pepper to taste
- Olive oil for drizzling
- Fresh Parsley for garnishing

Preheat the oven to 400 degrees. Put parsnips onto a baking pan and drizzle olive oil, salt, pepper and half of the herbs. Roast the parsnips until they start to brown. In a processor or blender, puree the parsnips with the lemon juice and gradually add the milk until the dip reaches your desired consistency. Add nutmeg and the rest of the herbs. Season to taste and serve with fresh parsley.

Roasted Beet Dip
- 1 large beet, scrubbed clean
- The zest and juice of 1/2 lemon
- 1/4 cup parsley
- 1 - 6 oz. container of Greek Yogurt
- Salt and Pepper to taste

Preheat oven to 400 degrees. Tightly wrap the beet in foil and place onto a baking sheet. Roast for about 40 minutes or until a knife can easily slide in and out of the beet. Once it is cooked through, set it aside until cool enough to handle. Using paper towels, gently rub the skin of the beet off and carefully grate it with a box grater. Add the yogurt to the beets and blend thoroughly, adding the zest and juice. Season to taste and add the parsley right before serving, reserving one piece for garnish. 

10.30.2011

Pumpkin Mac and Cheese with Sage Breadcrumbs


Last week my Pumpkin Mac and Cheese with Sage Breadcrumbs was featured on Boston.com and because I was really happy with the results, I wanted to share the recipe here as well. While you can certainly make this recipe utilizing canned pumpkin puree, I suggest making your own pumpkin puree from scratch. It does take a little extra elbow grease with the seeding and roasting of the pumpkin but I assure you the extra effort is well worth it. Homemade pumpkin puree has this velvety texture that the canned stuff just can't compete with.


Pumpkin Macaroni and Cheese with Sage Breadcrumbs

1 – 2 1/2-3 lb. Sugar Pumpkin, scrubbed clean
6-7 whole cloves
3 pieces of whole wheat bread
1 lb. dried pasta
½ Vidalia onion, diced
6 TBS + 2 TBS butter unsalted butter, at room temperature
6 TBS flour
2 1/2 cups whole milk
1 cup shredded smoked Gouda
1 + ½ cups sharp cheddar cheese
1- 8 oz. log of goat cheese
1 TBS whole grain mustard
1 TBS + 1 tsp fresh sage, finely chopped
A generous pinch nutmeg
2 tsp cinnamon
Olive Oil for drizzling
Salt and Pepper to taste

Preheat the oven to 400 degrees. Carefully cut the pumpkin into six equal parts and scoop out the seeds. Pierce the insides of the pumpkin pieces with the cloves, salt generously and then lay onto a cookie sheet, flesh side down. Roast pumpkin until it is very soft, about 35-45 minutes. Set aside until cool enough to handle, then peel off the skin of the pumpkin and place the flesh into a blender or processor. Blend the pumpkin until smooth and velvety, and set the pumpkin puree aside.
On a baking sheet, toast the three pieces of bread until they start to brown a bit. Set them aside to cool, then use a processor to pulse the bread crumbs. Mix in 1 tsp fresh sage and a pinch of nutmeg. Using your hands, combine 2 TBS of softened butter to the crumbs until they are evenly distributed. Season with salt and set aside.

Heat a medium-sized sauce pot and add enough olive oil to lightly coat the pan. Add the diced onions and a generous pinch of salt and cook on medium heat until they start to lightly brown (about 15 minutes). Add the butter to the pot and once it has completely melted, gradually add the flour, stirring constantly. Let the butter-flour mixture heat for a minute or two and then remove the pan from the heat and gradually add in the milk, stirring constantly. Return the pan to medium heat and add two cups of the pumpkin puree, stir, then add the mustard, goat cheese, smoked Gouda and 1 cup of cheddar cheese. Stir until the cheese melts. Add the 1 TBS sage and cinnamon and season with salt and pepper to taste.

In a large pot, bring water to a boil and add a generous amount of salt. Cook the pasta until very al dente (about 5 minutes). Strain pasta and add to the cheese sauce, and pour into an oven-safe casserole dish. Top with remaining ½ cup of cheddar cheese and Sage Breadcrumbs. Bake, uncovered at 400 degrees until the breadcrumbs brown, about 30 minutes. Let cool for 5-10 minutes before serving.


9.20.2011

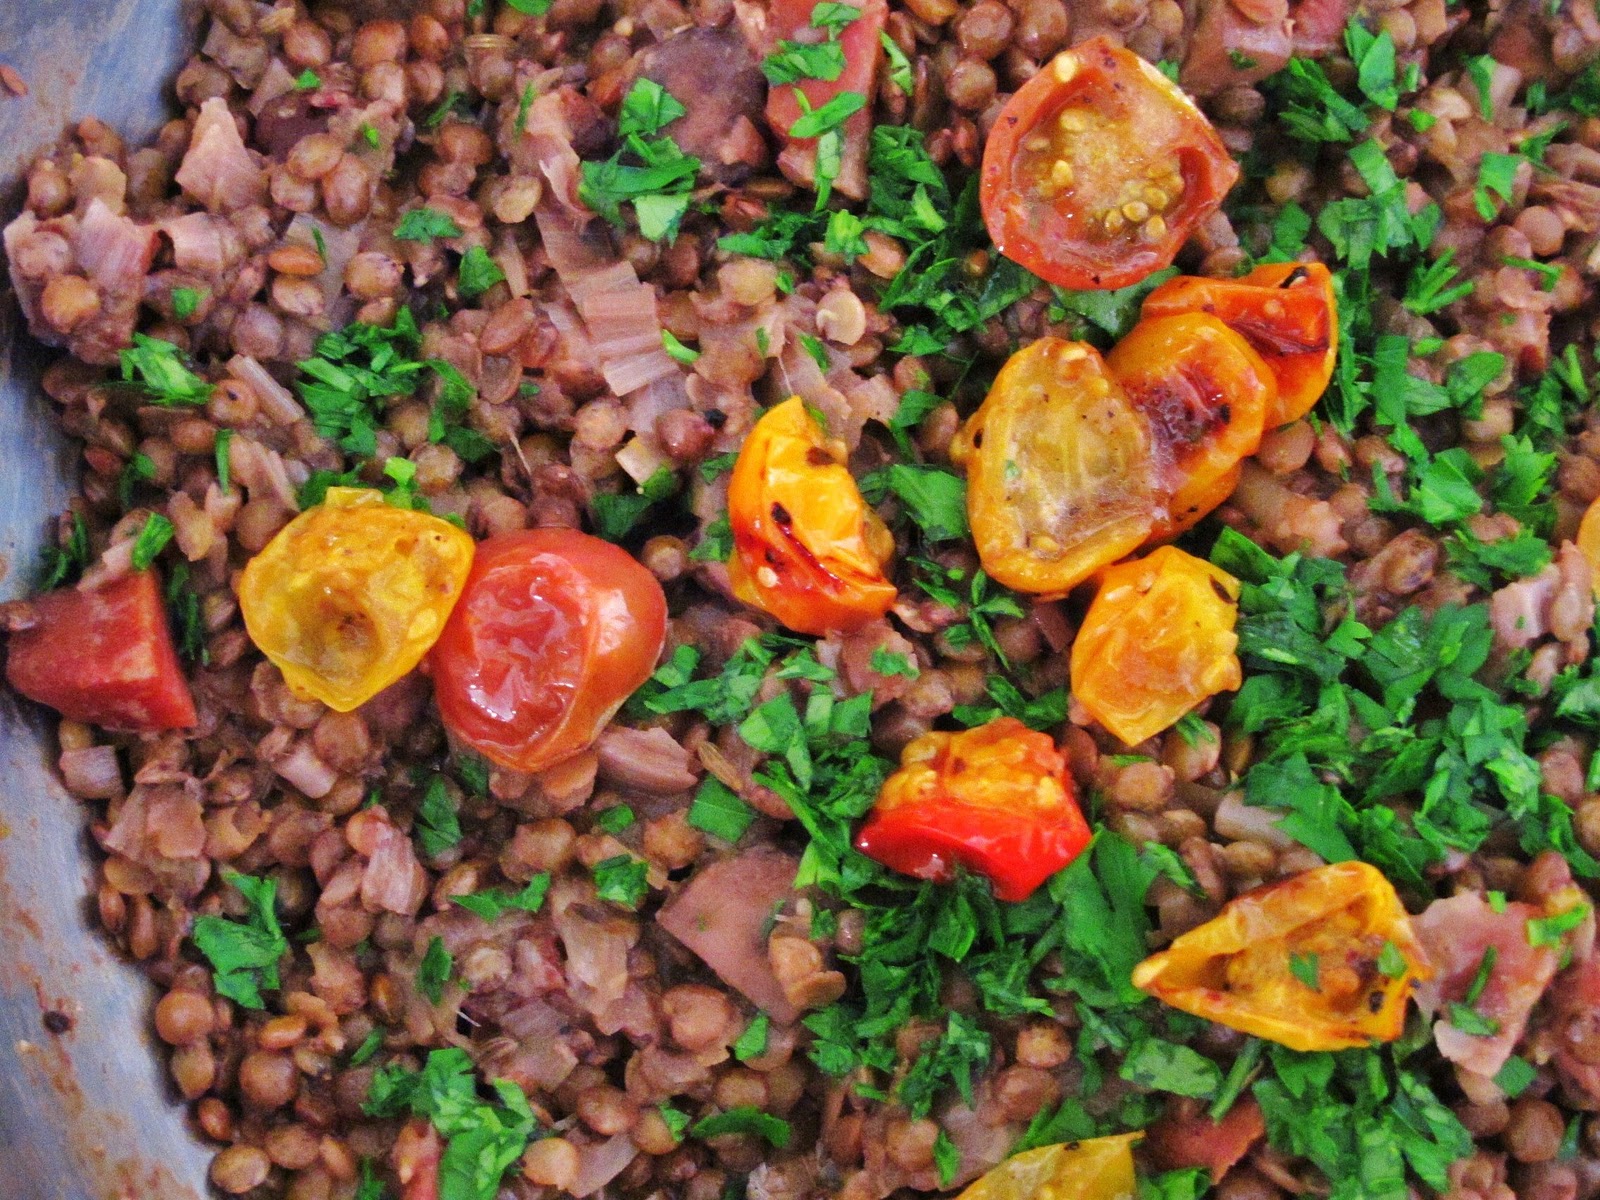
French Lentils with Meyer Lemon and Heirloom Cherry Tomatoes

Lentils, if you haven't cooked with them a lot before, are something that you must try. It seems that lately, lentils have become one of my go to main meals. So saturated in nutrients and bearing a striking resemblance to little pebbles, once cooked in simmering water or stock, they're so easily made delicious.


I like them best with a hearty scoop of Dijon mustard and a splash of Sherry vinegar mixed in just before serving. It gives the lentils a slight, yet welcome tang. I also like to add seasonal roasted vegetables and sometimes I'll add meat (pork, I find, works especially well) to make them even heartier. I like to cook them just until they are cooked through so that they have a great texture to them.


This recipe has an unsuspecting addition of tomatillos, which I happened to have on hand and I roasted them down before pureeing and mixing them in, which gave the dish some extra body. Beautifully sweet heirloom cherry tomatoes were also roasted down until their sweetness concentrated and they got delightfully jammy. I also used the zest and juice of a Meyer lemon, a softer, muskier relative of the lemon (of course, regular lemon would work just fine here too). Fresh herbs finished everything off and the meal was served right away, while everything was warm. Alternatively, bits of leftovers would make a fantastic addition to a next-day lunchtime..


Meyer Lemon Lentils
- 1 cup lentils, preferably French lentils, rinsed
- Just enough water to cover the lentils, additional might be needed
- 1 leek - just the white part, cleaned thoroughly and sliced into half-moons
- 1/2 pint cherry tomatoes, washed and halved
- 1 TBS Dijon mustard
- 1 generous splash Sherry Vinegar (balsamic also works well)
- The zest and juice of 1 Meyer Lemon
- 3 tomatillos
- Fresh parsley and mint, washed and finely chopped
- Extra Virgin Olive Oil, for drizzling
- Salt and pepper to taste

Preheat the oven to 400 and place the tomatillos and cherry tomatoes on a silpat, parchment or foil-lined baking sheet. Drizzle with olive oil and season with salt and pepper. Roast until the tomatoes soften and start to brown. Note: the cherry tomatoes will probably roast faster keep an eye on them. Once done, take them off the pan and set them aside until ready to use and continue roasting the tomatillos until very soft. Once the tomatillos are done, set aside until cool enough to handle. Using a blender, puree the tomatillos until they are a thick, sauce-like consistency.

In a hot skillet, drizzle olive oil and add the leeks. Heat until softened and add the lentils and just enough water to cover them. Sprinkle in salt and allow the lentils to simmer gently. You may need to add additional water if the lentils absorb it all before they are done cooking. You'll know the lentils are done when they are softened but still have the slightest bit of bite to them. At that point, add the mustard, vinegar and pureed tomatillos. Stir to combine. Add the Meyer lemon zest and just enough juice so that you can taste a little lemon but without it being too strong. Taste for seasoning and then dot the cherry tomatoes on top just before serving and finish with fresh herbs. Serve immediately.

9.19.2011

Beet Risotto with Early Fall Vegetables

Poor beets. They're like the kid that always gets picked last in gym class. They're rarely the star of the dish, instead, and not even until recently, had they earned themselves a supporting role in salads, but isn't it time that they deserved more attention and respect? When simply roasted, their sugars concentrate and they become intensely sweet and they give off this unparalleled deep magenta color that seeps into whatever it is you're making. Shouldn't that earn them some points?


The base of this dish was going to be brown rice at first, but then I decided that I wanted capitalize on that beautifully bright juice and make sure those beets really got their opportunity to shine. Risotto gave me that chance to spotlight my star ingredient and with that early fall chill in the air, a nice creamy risotto seemed like a good move.


Because I wanted to play off of that earthiness that the beets already have, I added roasted parsnips to my risotto, which only deepened those fresh late summer/early fall flavors. I then took advantage of the naturally rich magenta color of the dish to add a color contrast of bright green blanched and chopped spinach and sliced heirloom tomatoes that were kept away from heat so they give off a burst of delightful freshness with each bite. The entire dish was finished off with lemon zest, for brightness, and goat cheese, to boost up the richness of the dish and make everything just sort of melt together into one giant bowl of seasonal flavors, with all the focus being on the humble beet.


Beet Risotto with Early Fall Vegetables
- 1 large beet
- 1 cup Arboro rice
- 1/2 onion, finely diced
- Water for boiling and to add to the risotto
- 1 lemon, zested and juice reserved
- 2 TBS goat cheese
- 4-5 parsnips, roughly chopped into equal sizes
- 1/2 pint cherry tomatoes, halved 
- 1 small bag fresh baby spinach
- Salt and Pepper to taste
- Extra Virgin Olive Oil
- Fresh parsley

Pre-heat the oven to 400 degrees. On a baking sheet, spread out the parsnips and drizzle olive oil, salt and pepper. Entirely wrap the beet in foil or parchment paper and place it on the baking sheet with the parsnips. Roast the vegetables until the parsnips start to brown and are very soft and the beet shows no resistance when pierced. (Note: the parsnips will be done first so just remove them and set them aside while you continue to roast the beet). Once the beet is done, set it aside to cool and using paper towels to avoid staining your hands, gently pull off the skin, dice the beet's flesh and set it aside.

In a large skillet, wilt the spinach and then shock it in ice water to preserve its color. Chop the spinach and set it aside. 

In a medium-sized sauce pan, bring water a boil. Heat a large skillet on medium heat and coat the pan with a light layer of olive oil. Add the onions and a generous pinch of salt and sweat them for a couple minutes until they become translucent. Add the arborio rice and heat for a minute or so, stirring to warm the rice. Gradually add a ladle full of the boiling water to the rice and stir until most of the water is absorbed. Continue to add more boiling water once it gets absorbed while stirring frequently. Once the rice is almost cooked through, add the beets and stir to release their juices and to color the risotto. Next, add the goat cheese, lemon zest and enough lemon juice to give the risotto a light lemon flavor. Add the parsnips and fresh tomatoes, season to taste and add the spinach right before serving. Garnish with fresh parsley.

9.16.2011

Black Barley of Death


The inspiration for this recipe came from one ingredient and this post started the same way all the others do; with a grocery list and a general idea what I wanted the end result to be. In this case, the inspiration inducing ingredient was black barley; a deeply colored cousin of the commonly known white barley. I had come across it the other day in Whole Foods and couldn't wait to put it to use, especially since I had never seen, nor heard of it. A quick Google search rendered little information on my new find so I got to work, treating it just like I would treat white barley.


I wish I could tell you that every recipe I create comes out at least somehow how I imagine it to be, but as anyone whose ever spent any time in the kitchen knows, that is an impossible feat to achieve. When things go wrong in the kitchen, it's easy to get frustrated and it seems the more you carefully select your ingredients and plan it all out, the more of a let down it can be. For me, one of the hardest lessons to learn (and I'm still in the process of learning it) is to take that frustration, learn what you can from it and then make the most of it, by salvaging what you can.


This dish was supposed to be a fusion of Middle Eastern flavors combined with some classic combinations and prepared with a couple of twists and turns. I started by prepping my ingredients and laying them out on the butcher's block so that they'd be at the ready. I made a vegetable stock out of the classic trio of carrots, celery and onions and then I added whole cloves and a bay leaf and let that simmer before I strained it. Once that was done, I reached for my star ingredient, black barley, and added it to my homemade stock. I let that simmer for an hour, but noticed that the barley still hadn't done much. I added water, the stock had been absorbed, then covered and let that simmer for another hour and a half. Still no results. By this time, in an emotional fit of frustration combined with hunger, I threw in the towel, dubbed the barley, "Black Barley of Death" and reached for my jar of couscous. Within 5 minutes, I had all of my components of my original dish added and I was ready to eat. Thank heavens for couscous..


While the results were not entirely what I expected, the flavors still worked together nicely. The fresh figs still gently popped with each bite, the eggplant still was soft and earthy and the fresh mint and parsley were still bright and welcome. I've put the original recipe below and I recommend trying it with barley, risotto, rice or in a pinch, turns out, couscous works just fine.


1 cup barley
5 fresh figs, quartered
1/2 green bell pepper, finely diced
1 eggplant, cubed
1 mango, diced
1 stalk celery, diced
1 onion, diced
1 carrot, diced
1 bay leaf
3 whole cloves
1 orange, zested and juice reserved
1 tsp coriander
2 tsp cumin
A handful fresh parsley, chopped
A handful fresh mint, chopped
Salt and Pepper
Olive oil

In a medium-sized sauce pan and on medium heat, coat the pan in a thin layer of olive oil. Add the carrots, onion and celery and a generous pinch of salt. Cook the vegetables until they soften slightly and start to caramelize a little. Fill the rest of the pan up with water, add the bay leaf and cloves, lower the heat and let it simmer for a minimum of 30 minutes, strain out the vegetables and set the stock aside.

While the stock is simmering, coat the eggplant in a thin layer of olive oil and generously sprinkle with salt and pepper. Roast the eggplant in an 400 degree oven until softened and set aside until ready for use.

Heat another sauce pan on medium heat and add another layer of olive oil. Heat the barley for a minute or so to toast it a bit. Add 3 cups of the vegetable stock, cumin and coriander, and bring mixture to a boil. Lower the heat to a simmer, cover the barley and let it cook until tender. Add the peppers and gently stir the barley to let the heat cook them through. Add the figs, eggplant, mango and orange zest, season with salt and pepper and then gradually add in orange, adding just enough to give it a light orange flavor. Finally, add the fresh mint and parsley, gently stir and serve when warm.

8.17.2011

Sweet Pea Pasta with Roasted Tomatoes, Cranberry Beans and Swiss Chard


Just the other day I had made the startling observation that we are already halfway through August. When did that happen? I have yet to shuck enough peas, eat enough juicy heirloom tomatoes or have my fill of enough berries to be ready to move on the next season. It then occurred to me that there are so many fruits and vegetables that are at the peak of their prime this time of year and if I was going to experience them at their best, I had better get cracking. It was this thought and mindset that inspired this dish - homemade pasta with fresh pea and mint puree, tossed with cranberry beans, roasted cherry tomatoes and chopped swiss chard.


There's something so calming about sitting on a front porch, barefoot, on a sunny day shucking peas. It made me long for a Mason Jar filled with chilled iced tea or maybe some freshly squeezed lemonade? As much as I love fall, I'm just not sure I'm ready to wave good-bye to summer yet and all its tank top and flip-flop wearing glory.


This dish honors all of those wonderfully sweet flavor of summer and neatly packages them up in a bowl. The fresh tomatoes, once they've spent some time slow roasting in an oven with a drizzle of olive oil and a pinch of salt and pepper, get delightfully jammy and the chard provides a naturally rustic balance while the cranberry beans emphasize that earthy tone, reminding you where everything came from. The pea puree ties it all together and brings out a bright sweetness and then it gets lightly dusted with fresh Parmesan cheese, just before serving. This dish is best served when warm and enjoyed slowly, preferably on a front porch on a hot summer night.

Sweet Pea Pasta with Roasted Tomatoes, Cranberry Beans and Swiss Chard
- 1 pound linguine (I used fresh, but boxed works just fine)
-  1/2 pound fresh peas, shucked and rinsed
- 1/2 pound cranberry beans, shucked and rinsed
- Zest and juice of one lemon
- 1/2 cup fresh mint
- 1 bunch Swiss Chard, rinsed thoroughly and chopped, separating the stems from the leaves
-  1 pint cherry tomatoes, rinsed and halved
- Extra Virgin Olive Oil
- Salt and Pepper

Start by blanching the peas by boiling them in generously salted water for a couple of minutes until they are just cooked through. Immediately strain the peas and dump them into a bath of ice water to stop the cooking process and to preserve their color. Repeat the process with the cranberry beans and set both bowls aside. Next, blanch the swiss chard by cooking the stems first until almost done and then adding the leaves. Cook until tender and dip into ice water to stop the cooking process. Set aside.

In a 350 degree oven, heat the cherry tomatoes with a drizzle of olive oil and pinch of salt and pepper until they start to brown and become very soft.

In a blender, combine the Peas, a healthy splash of olive oil, the zest and juice of the lemon and the fresh mint. Blend until very smooth and season to taste. (If the sauce is too thick, you can add a little water.)

Next, cooking the pasta in a large pot of generously salted water. While the pasta is cooking, heat a skillet with a bit of olive oil and heat the cranberry beans and Swiss chard. Once the pasta is very al dente, add it, plus a little of the pasta water, to the skillet and toss to combine. Add the tomatoes and finally the pea sauce and heat it through. Serve immediately with freshly grated Parmesan cheese.

6.01.2011

Roasted and Chilled Chickpea and Herb Salad


Within the past couple of days, it seems a switch was flipped to summer and I'm welcoming the new season with open arms and new recipes. Gone are the days of braising hearty dishes and heavy comfort food, the warmer months are all about crisp vegetables, ripe fruits and lighter, fresher fare. Usually with my summer-time recipes there's a lot less fuss over a dish and because my apartment can get pretty toasty, pretty fast, my recipes also tend to get created with minimal help from the heat of a stove.


While the chickpeas in this salad were roasted to help bring out that beautifully natural nuttiness of theirs, the salad is then chilled and served cold, making this a perfect candidate for a make ahead meal that you can prepare hours or even a day ahead. The flavors in this dish are bright, with lots of fresh squeezed lemon, cumin, chopped cilantro and mint and then everything gets balanced out by salty crumbles of feta. The shreds of carrot cling to the roasted chickpeas, boosting the crisp texture of the dish up a bit while the crisp cucumbers add another element of crunch. 

Roasted and Chilled Chickpea and Herb Salad

- 1, 15 oz can of chickpeas, drained
- 1/2 English cucumber, diced
- 1/4 cup feta cheese, crumbled
- 2 TBS fresh cilantro, chopped
- 1 TBS fresh mint, chopped
- 1 tsp cumin
- The juice of one lemon
- 1 carrot, peeled and shredded
- Drizzle of olive oil
- Salt and Pepper to taste

In a foil-lined baking dish, roast the chickpeas in a bit of olive oil, and a sprinkle of salt and pepper, in the oven at 425 degrees. Stir them up every 10 minutes or so until they start to turn golden. Once this happens, set them aside and chill. Meanwhile, in another dish, combine the cucumbers, carrot, lemon juice, cumin and herbs. Add the chickpeas and combine. Add another drizzle of olive oil to the bowl, feta crumbles and mix thoroughly. Season to taste and serve chilled.

3.28.2011

Hurry Up Spring Radish and Herb Dip


Oh spring. Hurry up and get here, please? We've had enough cold weather and heavy sweaters, hats and mittens.  Please bring on warmer weather, longer and sunnier days and fresh new spring produce. Pretty please? What if I give you a little nudge with a spring inspired dip. Would that help remind you to come to Boston?


This dip was inspired by a craving for lighter fare and something that reminded me of spring.  To me, radishes actually taste like spring, if that makes any sense at all. When they're fresh and young and thinly sliced, they provide a fantastic crunch and a refreshingly sweet earthy and slightly peppery note to a dish.  I also find the contrast of the radish's vibrant fuchsia colored skin against its clean white center to be a fresh and beautiful addition too. With regards to this dip, the chopped radishes provide a slightly pink tinge and their fresh flavor is heightened by some fresh lemon zest.  Adding to that, I used a bunch of fresh herbs because to me, fresh herbs signify spring, especially parsley.  Often times I find that parsley is just haphazardly sprinkled onto a dish at the end just to say that the dish is garnished.  While fresh parsley does provide a beautifully bright hue that perks up an otherwise bland looking dish, I think that the bright and almost slightly citrusy flavor of parsley is so versatile and so under appreciated at the same time.  While you could certainly use dried herbs here, I'd recommend at least using fresh, flat leaf parsley because the flavor of fresh cannot be matched by dried. (My recipe below is for fresh herbs and if you decide to go the dry herb route, just cut the measurements in half.)


What's best is just how easy this dip is to make.  From start to finish it takes about 10 minutes to make.  For best results, make a couple hours ahead or even a day in advance so that all the flavors have more time to come together.  For serving, I thought the crunch of carrots went well with this dip but you could use any fresh vegetable.  You could also hollow out a nice pumpernickel bread to make a bread bowl for this dip or you could serve it with warm slices of baguette.

Spring Radish Herb Dip


2 cups sour cream
6 radishes, cleaned and finely diced
3 TBS fresh parsley, roughly chopped
2 tsp dill, roughly chopped
2 tsp thyme, roughly chopped
2 tsp chives, roughly chopped
Zest of 1/2 lemon
Salt and Pepper to taste

Combine all the above ingredients into a bowl and mix thoroughly to combine. Season to taste and adjust herb amounts to taste.  Serve with fresh, raw vegetables or sliced pieces of bread.

3.24.2011

Roasted and Spiced Carrot Gnocchi

Roasted and Spiced Carrot Gnocchi
Is there a limit to how much one person can make and then blog about gnocchi? If there is, I'm sure I've hit that mark a long time ago. I'm sorry, one last post about it and then I'll put my obsession to rest. At least until next winter. Deal?

Toasting Cumin Seeds
This time I did something a little different.  Instead of using potatoes as the base of the gnocchi dough, I used pureed roasted carrots.  With the addition of flour, (remember when we talked about the role of flour in gnocchi? Same rules apply.) toasted and crushed cumin seeds, cinnamon and just a teensy bit of tomato paste to help preserve the beautifully bright fiery orange color, these aren't your average gnocchi.  To serve them, I blistered up the sides a bit in a hot skillet with a healthy drizzle of extra virgin olive oil and finished with a little squeeze of fresh lime juice.

Roasted Carrot Puree
For the final result, I topped the roasted carrot gnocchi with some bright, toasted pistachios.  I want to pause for just a moment and talk about how underrated and under appreciated pistachios are. They have such an earthy sweetness about them and their flavor is so neutral that they work well in all sorts of dishes; spicy, sweet, earthy and rustic, ethnic or domestic favorites and specialties.  And the color! Oh the color. That bright green that perks up even more after a good toasting, it's a great option for many recipes.  I particularly liked how the pistachios worked in this dish because not only did they provide a nice little crunching "pop", I loved the contrast of green against the bright orange of the carrots.

Fresh Roasted and Spiced Carrot Gnocchi


Roasted and Spiced Carrot Gnocchi


- 7-8 large carrots, washed and peeled
- Extra Virgin Olive oil for drizzling and for pan frying
- 1 egg
- 1 TBS cumin seeds, toasted and ground
- A pinch cinnamon
- 2 tsp tomato paste
- About 1 cup flour (this will vary, use this recipe as a guide), plus more for rolling
- 1/2 cup shelled pistachios, toasted
- A couple drops fresh lime juice
- Salt and Pepper to taste

Start by cutting the carrots into even sized sticks.  Drizzle them in olive oil and a little salt and pepper.  Roast in a 375 degree oven until they are cooked all the way through and starting to brown a little on each side.  While still warm, puree with a hand blender until carrots are an even texture.  Season with toasted and ground cumin seeds and cinnamon. Add tomato paste and adjust salt and pepper seasoning to taste.  Mixture should be a little heavier seasoned because other ingredients will still be added.  Add egg, mix thoroughly and gradually add the flour until the dough just comes together and doesn't stick to your hand when you press into it.  Gently roll out the dough into long snakes and cut them into bite sized pieces and lay them onto a floured surface.  Repeat with the rest of the dough.

In a large pot, boil salted water. Add gnocchi and carefully give it a stir. Once the gnocchi float, take them out of the pot and drizzle with some olive oil to avoid sticking.  Meanwhile, heat a skillet until very hot and add the olive oiled gnocchi to the pan. Quick fry it until the edges start to blister.  Toss with lime juice, top with pistachios and serve immediately.

2.26.2011

Wild Mushroom and Rosemary Gnocchi

Wild Mushrooms in a warm water soak
To make real good gnocchi it helps to think of the whole experience, from taking a pile of powdery flour and transforming it into soft and doughy potatoey puffs, like a relationship.  To get the very best results, you have to spend some quality time with the gnocchi dough. Get to know it. Listen to it. Care for it and understand what it needs and what you can do to make it happy.  Like most relationships, it might seem like a lot of work but I assure you the results are totally worth all the effort.

To start, discard any gnocchi recipes you have. That's right. Toss them right out the window.  You see, similar to relationships, there is no one set of rules that can be applied.  There's so many variables and I assure you, each batch will be completely different so you shouldn't think you can treat them the same.  Instead, start with the same basic components:  About 3 large Yukon Gold potatoes (I've made them with other varieties too but I think these tend to work the best as well as provide a welcoming golden hue to the dough) 2 eggs at room temperature, a hefty pinch of salt, a little sprinkling of nutmeg and black pepper and the main variable, flour.  When I make gnocchi, I like to set aside a huge bowl of flour because I know I'll need some to add to the dough as well as to keep my work surface lightly floured.


Next, don't try and take the easy and quick road by boiling the potatoes, you don't want to have to deal with any extra water.  Instead, take the time to bake them in 400 degree oven until they are completely done.  Then take them out and as soon as you can handle them without burning yourself, start to peel away the skin.  If you have a ricer this works best (if you don't have a ricer I recommend getting one. Totally worth it). If you don't that's okay too, you can mash them with a masher just make sure that you mash them well leaving no lumps behind.

At this point, you should be staring at a luscious pile of warm mashed potatoes.  Go ahead and add the salt, pepper and nutmeg.  Now give them a little taste.  They should taste pretty good.  If not, season accordingly and then add the eggs to the potato mixture.  By this point, you should be looking at a gooey mess.  Perfect. You're well on your way.  Start by adding a cup or of flour and massage that into the dough.  Once you've combined that initial bit of flour, listen to the dough.  Touch it, feel it. What does it feel like? Is it sticky? Keep adding flour in small amounts and incorporating it well just until the dough is tacky and your hands don't stick to it.  This step might take a while because you'll want to make sure you add the flour little by little so that you'll know just when the dough is ready.  If you get impatient and add too much flour, you'll end up with tough gnocchi instead of light pillows.  On the flip side of that, if you don't add enough flour, you run the risk of the gnocchi not holding their shape when you boil them and they could disintegrate.


Once you've established that your dough is ready, use a bench scraper or a knife to separate a little bit of dough (3 oz. or so) and roll it into a long, even snake.  Using your thumb as a measurer, cut small pillows and rest the little pillows on a floured baking sheet.  You can leave them as little squares or you can go a step further and roll them on the tines of a fork for a more traditional look.

After you've rolled out all of the dough, bring a large pot of salted water to a rolling boil and add the gnocchi.  Carefully use a spoon to move the water around to loosen the gnocchi if you think they are starting to stick.  Once they float to the top (this happens in a matter of minutes) wait another minute, carefully strain them and then do whatever it is you're going to do with them.  It can be as simple as rolling them around in a pan of butter and herbs or just drizzling some olive oil on them and some shaved Parmesan cheese and cracked black pepper.  For this post, I baked them up in a nice red wine tomato sauce and of course, cheese. Lots and lots of glorious cheese.  Additionally, you can add ingredients to the dough as well. I thought I'd shake things up a bit and throw in some wild mushrooms and rosemary.

Baked Wild Mushroom and Rosemary Gnocchi with lots of cheese..
And then it's time to enjoy the results of all your hard work.  It's okay to smile and look at the gnocchi admiringly as you lift that first bite to your lips.  You should be proud and happy and positively smitten with it.  That's the whole point of all the effort right?  The happy, sweet reward.  

2.21.2011

Truffled Cheddar Potato Pierogies

Pierogies, after a quick fry in some butter
I can't help but think of my Babcia every time I make pierogies.  The way she shuffled her feet on the linoleum floor of her apartment, her thick Polish accent and tough as nails attitude and fierce pride.  Babcia (affectionately called "Bobbie") was a heck of a lady.  You knew not cross her but you also knew how much she loved you and how proud she was.  Unfortunately I was only 9 when she died but the story goes that towards the end, when things got bad, my Dad went to visit her in the hospital and as stood next her bed, he head bowed and murmured a prayer.  She must have sensed someone was in the room because she opened her eyes, looked him square in the face and yelled in her thick Polish accent, "David! What are you doing?! Don't worry, if I die, I tell you!" Then she dismissed him, ordering that he return to work.  


I always wish that I got to know her as an adult.  I'm sure she would have shaken her head in disagreement when I didn't bring "a nice Polish man" to dinner and she would have questioned what the heck I was wearing (let's face it, the early nineties were bad years for us all).  But I also like to think we would have sat down at the table in her kitchen and over coffee, talked about her childhood in Poland.  She would have wanted me to know all about it.  Even as a kid, I remember her constantly telling me that "I'm a good Polish girl" (or was it reminding me to "be a good Polish girl"?) We would have talked for hours and then I would have had to drop her off at Bingo.  Bobbie loved that Bingo.


As I write this post I can't help but laugh a little and smile at the memory of her.  Although she passed away years ago and I never got to have that chat with her, I have food to connect me to her and I still think of her every time I make any sort of Polish food.  Now if that isn't a great legacy, I don't know what is.  


This recipe isn't her original, I adapted it and changed it a little (I'm sure she would have had a thing or two to say about that) but all the basics are still there.  The beautiful thing about pierogies is that, like ravioli, you can fill them with almost anything you can think of.  Traditional Polish stuffings (at least the kind that Bobbie made) were always potato and cheese, cabbage, mushroom and onion and two types of sweet pierogies, blueberry and apple.  (The blueberry ones were always my favorite).  I ended up stuffing mine with cheddar-truffle potatoes.  I'm sure she would have had something to say about that too.  But I also think she would have tried one and even though there's no way she'd admit it, I think she would have liked it.


Check out the recipe and more pictures after the jump and be sure to click back tomorrow, I'm going to show you Bobbie's trick with what to do with leftover pierogie dough...

What's Hot From The Small Boston Kitchen